Our May Athlete of the Month is Graham Hamilton! Graham is one of our newest Austin Weightlifting family members! From day 1, Graham has been a dedicated student! He is hungry for growth and the coaches certainly notice how hard he works in class! Not only was he killing it before the mandates, but he’s been majorly consistent getting on zoom sessions to continue that growth. He got creative and set himself up with a home platform that fits him perfectly! Even in less than ideal conditions, he’s continued to build. Graham, we are honored to have you as our May Athlete of the Month and as an awesome part of this team. Thanks for your all your hard work and we look forward to seeing all you accomplish in the years to come! Congratulations!
State your Name and/or Nickname please:
Graham Hamilton or “Grahamilton”.
Do the job nobody wants to do, when nobody’s looking.
My fitness background is minimal. I was active in skateboarding and sports when I was younger but around the time my daughter was born (2014) I fell into a slump where I wasn’t really doing anything active. Around summer of 2017 I decided I needed to do something about it and got back in the gym. Since then I’ve tried a myriad of things from CrossFit to hot yoga to spin classes to jiu jitsu. I’ve trained at big box gyms and the Y and even fancy places like Onnit and I can honestly say CFA is the best environment i’ve encountered thus far.
This time at CFA has been my first foray into weightlifting so I guess it’s been just around 4 months.

Coach Dylan made me feel so welcome on my first day and honestly that’s stayed consistent. I’d say the biggest difference between then and now is I already know a million times more about weightlifting than I did on that day. It was huge mystery to me when I first walked through the door.
What’s your favorite part of CrossFit Austin/Austin Weightlifting?My favorite part about CFA is the down to earth/family vibes. It feels like a real tight knit, no bs, neighborhood gym but with a LOT of knowledgable people which I love. The community aspect I guess.
Current Training Goals/PRs?
I’m still such a newbie at weightlifting my main goals are to keep perfecting my technique, increasing my mobility, and adding weight of course. I’d love to be able to snatch my bodyweight by the end of the year but I might have delusions of grandeur haha.
What advice do you have for folks just starting out?
Even though I’m new to weightlifting this isn’t my first time being new at something. My advice to anyone starting anything new would be to listen to the folks who’ve been in your shoes. If someone who’s walked the path you’re trying to walk gives you advice, trust that they know what they’re talking about and remember you’re here to learn.

Go to cheat meals/guilty pleasures would be anything involving queso, fried calamari, or Dominos thin crust pepperoni pizza haha.
I use my fitness outside of the gym for keeping up with my 5 year old daughter, Pearl (they get SO fast so quick!) I also enjoy mountain biking and I have a side-gig painting murals which takes it out of you as well!

Recently during an at home workout I found I was able to snatch my previous PR very easily just kind of testing the waters after finishing the day’s workout. Even though that previous PR was low since I was so new when I set it, I still felt proud that I was definitely progressing.
By far the biggest challenge I’ve faced in my fitness journey thus far has been a reoccurring back issue that got especially aggravated from jiu jitsu. So much sothat I had to give it up for now. Waiting to recover and having to find ways to work around it was difficult. Part of the reason I got into weightlifting was to strengthen my back and core and so far I think it’s helping!
If I could create and name a workout it’d be called “The Painter” and would involve lots of climbing up and down ladders, hauling paint cans around, and overhead mobility haha. Oh and don’t forget squatting!
What keeps me going on the days I don’t feel like is that “fitness as medicine” principle I mentioned before. I know what it’s like to take extended breaks and it’s so much harder to get in the groove compared to when you stay consistent. The more I do it, the easier it is, and I like when things that are good for me feel easy haha! So that makes me wanna keep it up. Plus, I always feel better after.What are your hobbies, interests and/or talents outside of training?
Hobbies outside of training are painting and biking as I mentioned before. I also love traveling, camping and anything outdoors, hiking and swimming with my girlfriend and our Goldendoodle Patsy. I also enjoy cooking and I still skateboard sometimes too!
 Something you may not know about me are I’m a native Austinite raised in South Austin and I’ve been sober for over 7 years.
Thanks so much to everyone at CFA for being so welcoming and friendly. The atmosphere in the gym really has made all the difference for me. I feel very humbled to be AOM and feel like I have some big shoes to fill, but I promise to continue showing up. I truly believe taking accountability for ourselves and attempting to create changes individually is the best way to encourage positive change in the world at large. Thanks y’all!


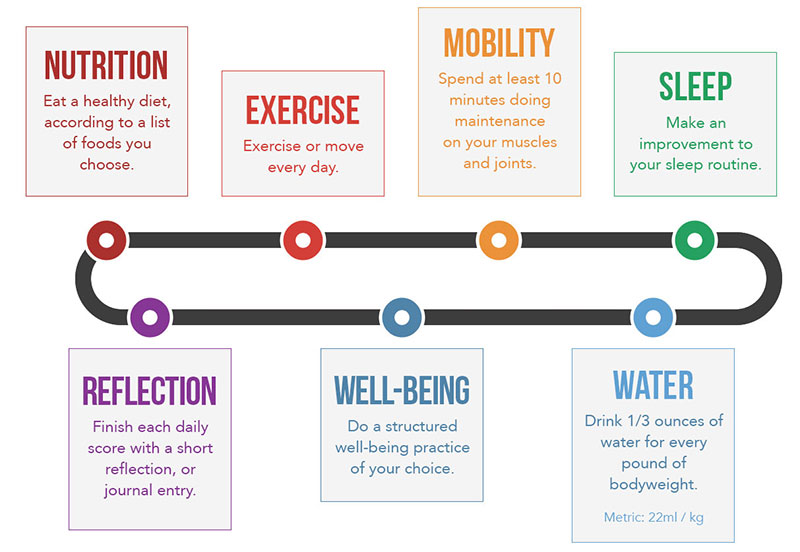 Well being, and reflection.