Kitchen Adventures || Gimme dat soup (Whole Life Compliant!)

Hey friends! How’s everyone doing? You guys making it through all this rain? I don’t know about you, but this rainy, cloudy weather has definitely impacted my menu. I very quickly turned from cold salads and embraced the fall recipes with all the warm feelings in my heart. Y’all….. I love soups. I love stews, crockpot meals, all the cozy stuff that gives you the warm fuzzies and a full belly. I know we’re probably not really there yet and it’ll go back to just being HOT once the rain clears, but for now, I’m in it 100%.

If you haven’t heard me blabbing or seen me posting about it for weeks, 1) Pull your head out of the sand because I don’t know how you could miss my incessant reminders, and 2)…Whole Life Challenge is starting in a couple of weeks! 🙂

I’ll save you the full explanation and let you read my info post HERE, but I do want to tell you about a couple of fun additions that we will have for this challenge!

First off, we are honored to welcome Coach Dylan’s lovely girlfriend, Erika to our WLC crew. She will be graduating in the spring with her degree in nutrition and has graciously agreed to join our team as a resource to answer questions and give some informational presentations on basic nutrition (more in depth for those interested) to help us get the most out of the nutrition portion of the challenge! She’ll be at our Kick Off Info meeting// Q&A this Saturday (Sept. 15 @ 10:15 am) so if you have any questions she’d love to answer them. She’s going to be planning her talks on the things you guys want to know most, so come help us out!

Secondly, we are SO excited to test out a new service for those folks on our Whole Life Challenge team. Tim’s bother Jon, if you don’t know, is a chef. He’s currently testing out some recipes and putting together menus to offer PREPARED MEALS as an option to WLC team members! Meal prep is something we all struggle with. Even if it’s part of your weekly routine, you can still find yourself needing a little help from time to time. This beta-test will be for Whole Life Challenge members only so if you want in on the fun (and the eats), join the team!

Ok, on to the recipe! This one is compliant for all 3 nutrition levels as long as you use an adobo sauce without sugar. If you can’t find one in

your grocery store, here is an easy compliant recipe to make your own! 

*Pro-tip! If you plan ahead, Thrive Market has a ton of amazing, compliant products that don’t include a lot of the ingredients you find in regular grocery stores. Stock up before the challenge on things you use regularly like broths, sauces, etc…. it will make life so much easier!

Crockpot Chipotle Chicken Soup Recipe

Ingredients

  • 1.5 lb. boneless chicken breasts
  • 4 cups chicken stock (check for added sugar!)
  • 1 15 oz. can full-fat coconut milk (unsweetened – no guar gum for Performance)
  • 2 cups ripe tomatoes, diced
  • 1 cup white onion, chopped
  • 1 16 oz. bag of fresh spinach
  • 3 TBSP chipotle peppers in adobo sauce – more or less to taste (sauce only)
  • 2 TBSP ground cumin
  • 1 tsp smoked paprika
  • 2 tsp sea salt
  • Optional Toppings: chopped cilantro, diced avocado, lime wedges, fresh jalapeno slices, green onions….

Instructions

  • Turn slow cooker to low heat setting and add chicken breasts, tomatoes, onion, chicken stock, chipotle sauce, cumin, smoked paprika and sea salt. Cover and cook 5-6 hours.
  • Remove chicken breasts and shred with 2 forks. Add chicken back to slow cooker and stir in coconut milk. Cook an additional 20 minutes, uncovered, to reduce slightly.
  • Add the spinach and allow to wilt (appx 5 minutes) before serving.
  • Ladle soup into bowls and serve with toppings of your choice and light one of those wood wick candles so you can pretend you’re sitting cozy by a fireplace 😉

We absolutely love Siete Foods tortillas and chips (found at Whole Foods, HEB, and also on Thrive Market in addition to their own site) so I served this up with some lime tortilla chips.

Kitchen Adventures || Keepin’ it easy – One pan veggies & sausage

Happy Hump Day! I hope you guys had an awesome Labor Day weekend! We spent most of the day traveling home from Arkansas (in the rain), but we got to enjoy some relaxing time at my grandmother’s ranch, fishing, doing some yard work, and chatting with her. She is going to be 98 years old next month! She still lives on her own and does a great job taking care of herself. I’m 100% certain that she’s doing so well at her age because for most of her life, she’s eaten from her own (or her neighbor’s) garden/farm and she STILL gets up every morning and moves her body. She stretches and “takes exercises” and keeps herself active physically and mentally every day. Her movements have adapted over the years, but she listens to her body and makes it a priority. She’s walking proof that longevity is achievable!

Y’all she’d kill me if she knew I was posting a picture of her in her robe, but I had to share!


Anyway, on to the recipe. This is one that’s so easy and FULL of good veggies. Because we were driving, I didn’t have my normal meal prep day, but this takes like 30 minutes to throw together and it tastes great. Even better if you can pull from your own veggie garden 😉 Enjoy!

***FOR THOSE OF YOU DOING WHOLE LIFE CHALLENGE – This is one that is SO easy to make compliant for all nutrition levels – just check the ingredients on your sausage or substitute chicken (or steak, shrimp, etc!!) if you can’t find compliant sausage.


Ingredients

  • 1 lb Smoked Turkey or Chicken Sausage (You can also pre-cook raw sausage of your choice to add to this)
  • 2 cups sweet potatoes diced into 1/2” cubes
  • 2 cups broccoli florets
  • 2 cups fresh green beans (ends trimmed)
  • 1 cup bell pepper chopped (any colors you like)
  • 2 cloves garlic minced
  • 2 tablespoons olive oil
  • 1 tablespoon Italian seasoning (or your favorite spice blend!)
  • ½ teaspoon salt
  • ½ teaspoon black pepper

(Other options for veggies that I’ve tried – asparagus, brussels sprouts, butternut squash, zucchini, cherry tomatoes, onions, carrots…. you can really choose anything you like!)

Instructions

  1. Pre-heat oven to 400F.
  2. Slice the smoked sausage into 1” rounds. Dice the sweet potatoes into small 1/2” cubes. Chop/prep the rest of your veggies to your liking/as needed.
  3. Add the sausage, veggies and minced garlic to a large baking sheet. Drizzle with olive oil and sprinkle with the Italian spices or your favorite spice blend. Seasoning with salt and pepper. Toss veggies with your hands until they are fully combined and coated with olive oil and spices.
  4. Bake for appx. 20 minutes, flipping halfway. You can portion this out on it’s own or if you want to serve it over brown rice, or quinoa, even on top of a salad, it’s extremely versatile!

And…. just because I still can’t stop watching it – Here’s the friend we made this weekend  😆

Kitchen Adventures || Bell Peppers for Breakfast


Let me begin by saying, I love stuffed peppers. I’ve tried several recipes for stuffed peppers in thepast, but they’ve definitely catered more toward lunch/dinner options. The first time I made these breakfast peppers, I was hooked! This is another recipe that is so easy, you guys won’t believe it. The best part is that you can put any combo of meat/veggies you like to make it exactly how you want it.

I portioned these guys out into meal prep containers with some kale sauteed in coconut oil with a touch of sea salt. Enjoy!


  • Pro-Tip – LEAVE THE STEM ON THE PEPPER… The first time I did this, I cut it out…. and all my stuff fell out…. By leaving it intact, it turns the pepper into a perfect little “bowl” and keeps all your stuff in place 😉

Other helpful notes:

  • Try to choose peppers that will be relatively when you lay them in the dish – Less likely to spill!
  • Mix up your veggies, meats and cheeses as you desire — or make several different versions in the same dish and just pour the whisked eggs right over top!
  • These stuffed peppers keep well in the refrigerator for a couple of days but aren’t great from the freezer — unless you are okay with your peppers being totally soft and mushy!


INGREDIENTS

  • 3 bell peppers halved and seeded (leave those stems on!)
  • 6 eggs
  • 1/4 cup milk
  • 3/4 tsp salt
  • 2 tbsp chopped green onion
  • 1/3 cup chopped fresh spinach
  • 3/4 cup shredded cheese divided
  • cooked meat of your choice – I used sausage *I went ahead and made the whole pound. I had a little left over, but it depends on the size of your peppers…

INSTRUCTIONS

  1. Preheat oven to 350 degrees F.
  2. Brown your sausage in a pan just until it is no longer pink.
  3. In a medium bowl, whisk eggs, milk and salt until combined
  4. Lay your peppers in a lightly greased baking dish (whatever size works — you want them to be a little snug so they don’t move too much and spill).
  5. Begin filling your peppers with your cooked meat, layering in your cheese, onions, and spinach (or whatever you decide to fill them with) Reserve some cheese to layer on the top to achieve a nice golden crust!
  6. Divide your egg mixture between your peppers and sprinkle with remaining cheese. Bake for 30-40 minutes, until eggs are set.


Night Of Champions || Back To School!

Night of Champions is our in house partner competition that offers our members a chance to compete, have some fun, and help the gym all in one night! Partners join together to give their all in this two part competition in hopes of snagging a podium spot! Don’t have a partner? Post in the members page and make a new friend! This NOC theme is “Back to School!” Grab your partner and hit the books (or the training floor 😉 )!

Teams of 2 – Male/Male or Female/Female
Rx & Scaled Divisions available!
Night of Champions will consist of 2 WODs
PART 1 – A test of skill & strength

PART 2 – A test of teamwork and conditioningMovements will be announced 2 weeks out and final workouts announced 1 week out. Stay tuned!

FRIDAY SEPTEMBER 14
6:30 pm – Athlete Check-In
7:00 pm – PART 1 Start Time

REGISTER HERE

$50 per Team (this includes registration for both team mates) Only 20 spots available!

(Only 1 registration per team needed – We’ll send an email to get division and partner name)

***Proceeds from Night of Champions will go toward new equipment for the gym!***


JOIN US AFTERWARD AT AVIATOR PIZZA TO CELEBRATE OUR SEPTEMBER BIRTHDAYS!

Kitchen Adventures || Fresh & light lunch bowls

Image may contain: 1 person, sitting


Wow! As many of you know, Tim and I took a trip out to San Diego last week to see my best friend and meet her amazing little baby. Juliette was born on May 26 at only 23 weeks gestation and let me tell you guys, she is a WARRIOR. This amazing girl is growing and developing like crazy. She’s now breathing without assistance, regulating her own body temp, and gaining weight every day. When we were there, she was just over 4 lbs. That may sound like nothing (and let’s be honest, she’s tiny!) but she was 1 lb 5.9 oz when she was born so that 4 lbs is incredible. Ok, ok… I’ll get to the recipe, but I HAD to share how awesome it was to get to meet this girl. <3


Ok… so because of our trip, my Sunday meal prep day was non-existent, but I was still able to whip up several things on Monday afternoon after work. Any time I travel or if my nutrition gets off track a bit, I crave GREEN. The recipe I’m sharing today is SO easy, full of green, and has awesome flavor. Give it a go!

Ingredients – This recipe will make 4 “bowls” 
2 c. cooked jasmine rice
1 tbsp. oil
1.5 lb. ground turkey
.5 tsp or to taste – red chili flakes
cloves garlic, finely chopped
small jalapeno (seeded if desired), finely chopped
2 tbsp. plus 1/2 tablespoon grated fresh ginger
2 tbsp. low-sodium soy sauce (or coconut aminos)
4 tbsp. fresh lime juice
1 tsp. brown sugar (or coconut sugar)
English cucumber, thinly sliced
scallions, thinly sliced
1 c. fresh cilantro
1/2 c. fresh mint
Directions
  1. Heat your oil in a skillet and brown the ground turkey. Be careful not to overcook and dry it out. Add more oil as needed. Toss with garlic, red chili flakes, and 2 tablespoons grated fresh ginger. Remove from heat and toss with 2 tablespoons lime juice and 1 tablespoon low-sodium soy sauce (adding 1/4 cup water if dry).
  2. Whisk 2 tablespoons lime juice, 1 tablespoons low-sodium soy sauce, 1/2 tablespoon grated ginger and brown sugar.  If eating immediately, toss with cucumber and scallions; fold with cilantro and mint. Serve with turkey over rice. Add sliced avocado for some good fats!
  3. If packing for meals, pack 4 (3) cup bowls with rice on the bottom and turkey mixture layered on top. Keep vegetable mixture and sauce in separate containers. When ready to eat, heat rice and meat, then add veggies and sauce. Add sliced avocado for some good fats!


As always, shoot me a message with any questions and let me know if you make it! Enjoy!

-G


Kitchen Adventures || Chimichurri Meatballs and putting a meal together!

Happy Hump Day! Hope everyone’s week is going well so far. My apologies on missing a post last week. I was still kind of fighting some illness, but I’m back! This week I have an easy meatball recipe for you, but also just a quick tidbit on packing for the week. So far I’ve pretty much just posted single recipes, but that’s not how we eat. We generally have 2-3 items to create a “meal.” Depending on the recipe obviously and what needs reheated or stays cold, I’ll pack meals in different ways.

This week I made meal ‘bowls’ (they are actually rectangular dishes :P) to get us a through a few days of lunches. I use these 3 cup Pyrex dishes pretty much EVERY week. They are a great size for a meal (depending on what you are cooking). I’ve had mine for a few years now and I can say they’ve held up pretty well! Anyway, the recipe and amounts I made this week filled four of these which meant Tim and I could each have 2 days of lunches from it!

I love doing meatballs as a meal prep because they are easy, portable, and reheat very well. There are so many different ways you can do them. This week we have meatballs with a chimichurri sauce and roasted cauliflower and beets. Enjoy!

Chimichurri Meatballs

Ingredients
For the Meatballs
  • 1 lb ground turkey
  • 1/2 lb ground beef
  • 1/2 cup breadcrumbs I used Panko – if you want to sub Almond Flour you may, but cut it down a bit
  • 2 green onions minced
  • 3 cloves garlic minced
  • 1/2 tsp salt
  • 1/2 tsp black pepper freshly ground
  • 1 egg
  • 1/2 cup feta cheese crumbled (to top)
For the Chimichurri Sauce
  • 1/2 cup parsley minced – I prefer flat leaf, but you can use curly
  • 1/2 cup olive oil
  • 1/4 cup red wine vinegar
  • 1 tbsp fresh oregano chopped
  • 1/2 tsp red pepper flakes
  • 1 tbsp lemon juice
  • 1/2 tsp salt
  • 1/2 tsp black pepper freshly ground
Directions

Preheat your oven to 400 degrees.

In a large bowl, combine the ground turkey, ground beef, breadcrumbs, green onions, garlic, salt, black pepper and egg. 

Form the meatballs into small 1 inch balls and place them on a baking sheet lined with parchment paper.

Bake them for 20 to 25 minutes at 400 F degrees or until done to your liking.

While the meatballs are baking, in a medium size bowl, whisk together the parsley, olive oil, red wine vinegar, oregano, red pepper flakes, lemon juice, salt and pepper. Let it sit out at room temperature until the meatballs are ready.

Top with your chimchurri sauce and crumbled feta and Enjoy! 

*I was able to get about 25 meatballs from this recipe


For my veggies this week I went simple. I actually started my beets before I did anything else since they tend to take longer, but because I needed the oven at 400 degrees anyway, I did simple roasted beets and cauliflower.

For this, I used 3 large beets. I’ll wash them and trim the roots and tops, but leave the skin on. I coat them in coconut oil and wrap each one (whole) in aluminum foil. Roast at 400 for appx. 40 minutes (or until softened). Then, you can either rub the skins off with a paper towel (let them cool some) or just leave them on!

For the cauliflower, I used a whole head. Wash and cut it into florets. I coated this batch lightly in olive oil and seasoned it with salt, pepper, and a bit of garlic powder. I roasted it about 20 minutes (until the edges start to crisp).

To put it all together, I filled half the container with beets and half with cauliflower and then added 4-5 meatballs per dish. I leave the chimichurri off so that I can reheat the veggies and meatballs and then spoon the chimichurri on cold. Easy!

As always, shoot me a message if you have any questions and if you make any cool additions I’d love to hear them!


Fall 2018 Whole Life Challenge || Team CrossFit Austin


 “If it doesn’t challenge you, it won’t change you” -Zig Ziglar


Change can be challenging. Yet, without a challenge, there can’t be change. With the holidays right around the corner, we have the opportunity to create good habits that will help us make smart choices through the holiday meals!

We also hope that this challenge will create habits that carry over into the New Year so you can shift your New Year’s resolutions away from health and fitness goals (because they’ll already be in place!) and make more goals surrounding having fun in 2019!

During our last challenge, we saw some awesome results and had great time working through the challenges & celebrating our weekly wins with our teammates. We hope you’ll consider joining us on this journey again!


Whole Life Challenge is part fitness, part nutritional and body composition, and part accountability challenges. Our goals for each Fall 2018 Whole Life Challenger are:

  • Mental + emotional preparation for the longevity of a healthy lifestyle {awareness + action}
  • Individual fitness gains
  • Creation of lasting habits for individualized nutritional and body composition success
  • Physical & nutritional preparation to get you through the holidays and carry over into the New Year!


You + Whole Life Challenge = Team CrossFit Austin

Challenge = Change // Goals = Gains


{What is it?}

While everyone wants to look and feel better, it can be a challenge to know how or where to start. The Whole Life Challenge focuses you on the key areas of your life that produce real, life-long changes. Playing together with your friends and family in a fun and motivating daily game, you’ll create new healthy habits that last long after it ends.

The Whole Life Challenge focuses on 7 daily habits that you will learn and create for yourself as you journey through.

These 7 Daily Habits are:

    • Nutrition. Your food choices have the single greatest impact on your health, well-being, and community. When you make choices that keep you healthy, you give yourself the fuel to fulfill all of who you are. There are 3 levels to choose from that allow you to start making changes in a realistic and attainable way.  {Choose the level that is right for you}
    • Exercise. Humans are designed to move daily. Whether through workouts, activity, or simply enjoying the full use of your body, daily movement keeps you healthy and vital. You’re already moving regularly with us!
    • Mobility. In a sedentary world, our bodies get stuck. Daily mobility and stretching helps you move the way nature intended and continue enjoying freedom of movement into your later years.
    • Sleep. Modern schedules tend to dictate how many hours of sleep we’re entitled to. A practice of increasing that time, even by a little bit, can make big strides in robust health. You set the sleep goals that are right for you.
    • Hydration. More than anything, your body is made of water. This habit ensures that your body gets enough of its most basic resources for life.
    • Lifestyle Practice. The {WLC weekly lifestyle practices}turn a life into your life. Learn to step back, take stock, connect, and turn your attention to what is really important to you.
    • Reflection. Looking back, looking inward, or looking forward, daily reflection draws your awareness to what is working and what needs your attention today.


{How Do I Play?}

The {Challenge} begins with taking your preliminary measurements and completing a scalable workout that will be repeated at the end.

Throughout the 42 day challenge you will post your scores in the 7 categories listed above. The Challenge is designed in a way that we can work as a team to check in with and support each other on a daily basis.

To close out the Whole Life Challenge, you will repeat the preliminary measurements and workout to gauge how far you’ve come! But, it doesn’t end there! The Whole Life Challenge is designed to help you make healthy lifestyle changes that last.

{How Do I Register?}

You can register and join Team CrossFit Austin through the Whole Life Challenge {website}. Make sure you do join our team to participate with the community!

CHALLENGE BEGINS September 29, 2018
CHALLENGE ENDS November 9, 2018


Early Player Registration
August 21-September 12
Returning Player Price: $29.00
New Player Price: $39.00

Regular Registration
September 12 – September 29
All Player Price: $49.00


{What’s New This Year?}

Well, for one, the challenge is a little shorter. What used to be an 8 week challenge is now a 6 week challenge, but regardless, the goal is still the same. We’re here to create long-lasting, healthy habits to

We have partnered with {Body Analytics USA} to offer fast, accurate body composition testing. Their Hydrostatic Testing method uses a three component model which separates the body into 3 areas:

  • Bone, muscle and organs, along with connective tissue, collectively known as lean mass, sinks (is more dense than water)
  • Body fat floats (is less dense than water)
  • Total body water which is neutrally buoyant, but must be removed from your actual weight

By obtaining your dry weight and water weight, based on buoyancy, our specialized computer program can scientifically calculate your body fat as a percentage of your total weight. The ordinary scale cannot tell you if weight loss is muscle or fat while testing with Body Analytics will tell you exactly what took place with your body during your weight loss regimen.

This will be an additional service offered at CrossFit Austin on Monday, September 24th from 4:00 pm – 8:00 pm. Our post-challenge follow up will be on Monday, November 12th from 4:00 pm – 8:00 pm

Single test – $49
Pre & Post-test – $80

RESERVE YOUR SPOT HERE

August Athlete of the Month || Billie Cervera!

Each month we spotlight a different CFA athlete who stands out and shows just how awesome they are. What is it that makes up an Athlete of the Month? It may not be the person that finishes the fastest, Rx’s every WOD, or gets a PR every time they walk in the gym. Although we love and celebrate when those things happen, the Athlete of the Month is made up of much more than physical ability. This person shows up, gives their best every time, and then gives a little more. They are hungry to learn and always ready to do the work. They support their fellow classmates and encourage them to reach their goals. This athlete embodies what we believe the CrossFit Austin Community should be about.

Our August Athlete of the Month is Billie Cervera! Billie started classes in April of 2017 and has worked hard from day one! She went from being timid and worried about the movements to competing in our Night of Champions competition and kicking butt! She has her whole family moving and grooving in the gym! Billie and her hubby are part of our regular 5:30 am crew and we love having both of them! She is continuously growing in her journey here. Billie exemplifies so many of the qualities we look for in an AOM and has shown really amazing progress in her time here. Billie, the CFA Team is proud to honor you as our August Athlete of the Month and as an awesome part of this community. Thanks for your all your hard work and we look forward to seeing all you accomplish in the years to come! Congratulations!


State your Name and/or Nickname please:
Billie Cervera, Wild Bill & Barbara (nickname)

What is your fitness background?
I was very active in high school and actually took powerlifting 1 year. Not sure why I stopped!

After school I didn’t do much. I didn’t actually start working out until I had my second son which is when I felt I needed it. I started with home videos then worked myself up into a gym.

How long have you been CrossFitting?
1-1/2 years

Take us back to your first day of CrossFit… How did you feel? How do you compare it to workouts today?
I was super intimidated. I felt like everyone was looking at me . I wanted to lift heavy right away. I then realized I needed to work up to that and also work on form. I used to always do cardio then I found myself wanting to build muscle and so this is way more of a rush and just being surrounded by others pushes you to go hard.

What’s your favorite part of CrossFit Austin?
The people. I love being surrounded by others who push you to do more and encouraging you every step.

Current Training Goals/PRs?
 Squat snatch, pulls up. My PRs I swear I tell myself I need to record these and I don’t. So I have no clue at the top of my head however I know I am not where I use to be! 🏼

What advice do you have for folks just starting out in CrossFit?
Don’t be scared! Keep going and never give up! You really can do more than you think you can. Give it a year and you will see your progress.

What is your cheat meal go to? Mexican tacos by my mother n law! I mean I can make them too but she has a magic touch! And I have a weakness for cake & cookies.

How do you use your fitness outside of the gym?
I chase kids all day lol!! #momlife

Tell us about a moment you felt most proud of yourself during a workout.
When I finally did a handstand and when I first Rxd

If you could create a WOD and name it for yourself, what would it be?
“My Life”

4 rounds
18 burpees
2 Kipping pull-ups
22  hang power cleans
10 cal row
15 kbs


What are your hobbies, interests and/or talents outside of CrossFit?
 I love to just chill with my hubby. I enjoy taking my kids to do things just to see them smile. I love to work/hustle making money! I love helping others.

Tell us something we don’t know about you…
I got my husband’s name tattooed on me when we were only dating. He has no Idea either! Something about speaking into existence and writing it down will make it happen  It worked though! ️ Together for 12 years 🏼🏼


Leave the fine folks of CrossFit Austin with some parting words…

“A quitter never inspired anyone “

Kitchen Adventures || Portobello Tacos – Easy Weeknight Meal!

Hey, hey guys! How’s everyone doing this week? If you’ve seen me in the last 7 days you know I was sick and lost my voice for like a solid 5 days… Do you know how hard it is to coach/communicate/live/function without a voice??? Alright, I made due, and I’m on the mend and back in action!

With that said, life does go on whether you’re sick, exhausted, overbooked, or whatever. Life goes on and so does your need to feed yourself and your family. The recipe I have for you this week is one that can be completely done in 30 minutes flat. It’s healthy, DELICIOUS, and so easy to make that I’m guessing you guys will have this in your back pocket rotation for a long time.

So, we are meat eaters in our house, but let me tell you, you don’t miss it at all with these hearty tacos. The flavor and texture are so amazing and they are wonderfully filling. I’ve made several variations with the toppings and seasonings as well, but the recipe as it’s written below is a true-blue so ENJOY!

ROASTED PORTOBELLO TACOS

INGREDIENTS:

Don’t judge me! I never said I had plating skills 😉

Taco Ingredients:

  • 3-4 large portobello caps, stems removed
  • 1 Tablespoon olive oil
  • salt and pepper
  • 1 batch corn salsa (see below)
  • 1 package tortillas of your choice
  • 1 large ripe avocado, peeled, pitted and sliced
  • ½ cup chopped fresh cilantro leaves
  • ½ cup crumbled cotija cheese

Corn Salsa Ingredients:

  • 1 ½ cups whole-kernel corn
  • ⅓ cup finely-diced red onion
  • ¼ cup chopped fresh cilantro leaves
  • ½ teaspoon ground cumin
  •  pinch of salt
  • 1 jalapeno, seeded and finely-diced
  • juice of one lime (about 2 tablespoons)

DIRECTIONS:

Portobello Tacos:

Get your oven going at 400 degrees and line a large baking pan with foil or parchment paper.

While the oven is preheating, slice the mushroom caps into long, thin strips.  In a bowl, coat the mushrooms slices in a thin layer of oil. Lay them flat on your baking sheet and sprinkle generously with salt and fresh cracked pepper to taste.

Roast those puppies for about 12 minutes, until the mushrooms are cooked through and soft. They will shrink slightly in size.  (If you would like them more firm, you can bake for less time.)

While your mushrooms are roasting combine all of the ingredients for the corn salsa in a bowl and mix until combined well. You have a couple of options with this salsa. You can roast ears of corn beforehand or use frozen (thawed) sweet corn. I actually really like this salsa cold so I’ll make it first and let it chill while the mushrooms roast. Up to you!

If you would like to toast your tortillas, heat a large saute pan over medium-high heat until hot.  Then place a single tortilla flat in the pan and let it cook for 10-20 seconds per side, or until the tortilla begins to brown and bubble.  Immediately transfer the tortilla to a separate plate.

Once everything is finished, layer up those tacos however you like! I usually put 3-4 slices of mushroom, corn salsa, a couple of slices of avocado, shred some fresh cotija cheese and I’m a fan of sour cream so that makes it into the tortilla as well, but they’re tacos. You know how to taco!

Sweet potato side:

Serve these up with whatever you like, but this week I did a simple roasted sweet potato and black bean mixture. The potatoes take a while longer to roast so I started them first and then prepped everything else while they were going.

Wash and cube your sweet potatoes. Toss in the oil of your choice and roast at 400 degrees until soft (usually about 30 minutes depending on how big your cubes are). Rinse and drain a can of black beans. Mix with potatoes in a bowl and season to taste. I used a little salt, red and green chile power, and a splash of lime juice.

Chow down, friends! I’ll see you next week.

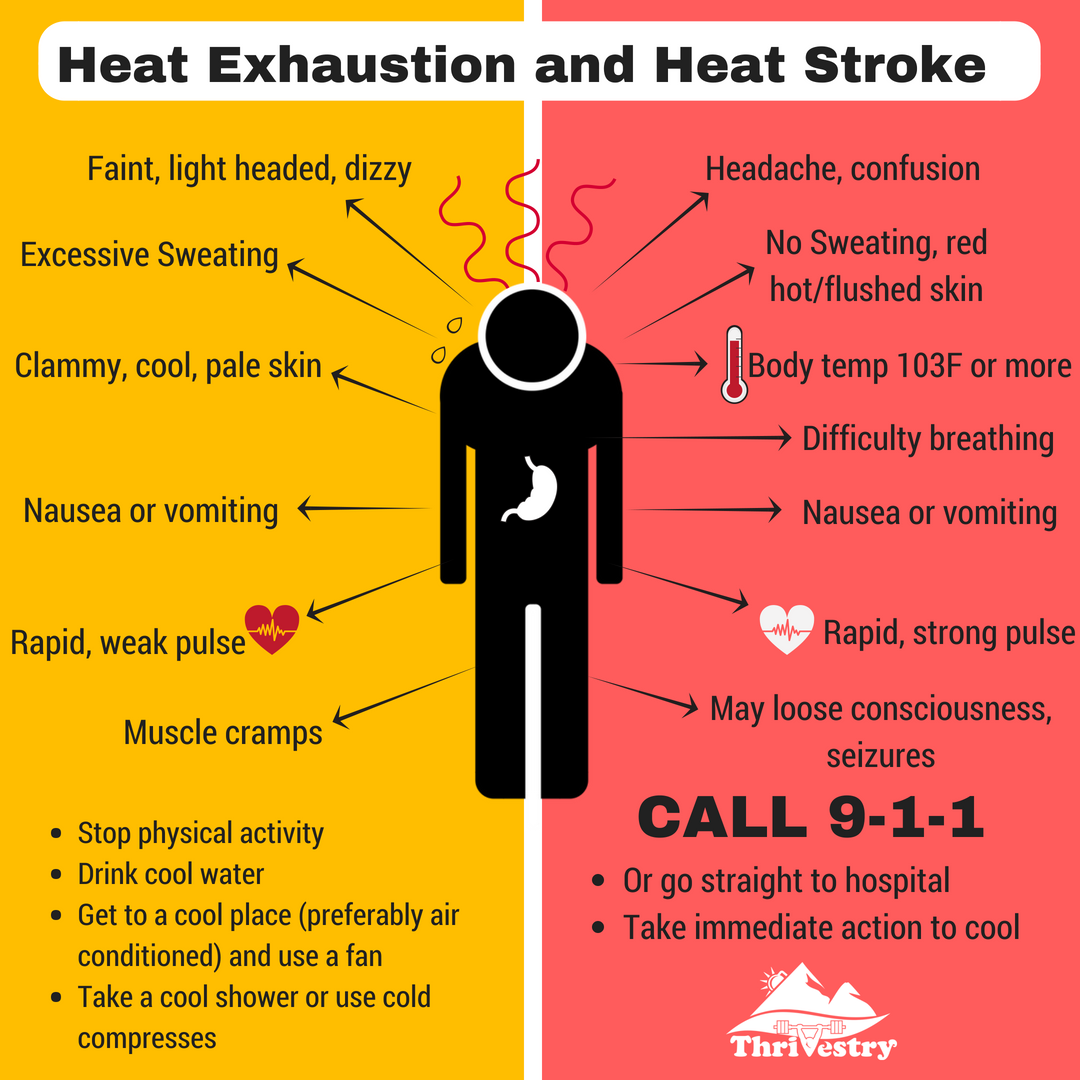
Overheating || What to look for and when to stop

When it is hot outside, and we are doing an activity that generates a lot of excess body heat, we are at risk of overheating. This is especially true when we are paying more attention to what round we are on, our form, and trying not to get passed by the gal/guy next to us!

Heat Exhaustion and Heat Stroke.png

Chances are, you’ve probably been somewhere close (if not completely) in heat exhaustion before on a hot day when doing a workout, but that doesn’t mean we shouldn’t know the signs so we can avoid it in the future.

Side Note: It is no coincidence that many of the symptoms of heat exhaustion look like the exact same things you experience after a particularly hard workout. These workouts make you HOT! There is evidence that making yourself hot (through training or even sauna use) is one of the stimuli that causes your body to adapt in positive ways like lower body fat, better heart health, better cognitive function, etc.!

Tips for Performance When Training in the Heat (and avoiding heat exhaustion)

  1. Stay hydrated! The human body is a hydraulic machine. Not only do we use our blood to move fuel and oxygen around, we use it transfer heat to our skin so it can be radiated to the atmosphere. As we sweat, we lose some of the fluid that allows our circulatory system to operate properly because we cannot transport nutrients/oxygen AND we can’t shed heat as effectively. If your urine is darker than light, transparent, yellow, you probably aren’t getting enough water!
  2. Make sure you are getting enough electrolytes. Electrolyte drinks are great, but make sure you are getting enough sodium. It is common for people who are avoiding processed foods to not get enough salt, especially if/when they are training and sweating a lot. The number one mineral that is lost through sweat is salt. Make sure you are getting enough of it!
  3. Stay out of the sun and/or stay covered up if you can’t. The sun adds a significant amount of heat to the body. If you can stay in the shade/indoors you will be much better off. If you must be in direct sunlight, wear lighter color clothes and a hat. Work on your tan after the workout is over.
  4. Keep your ego in check. Take stock of yourself and those around you. Is your pulse higher than normal? Are you sweating the normal amount? During your short breaks, are you recovering normally? If you start having the symptoms of heat exhaustion, you can first try taking an extended rest in a cool area. If you still don’t recover, it is time to ‘call it’ for the day and cool off. Make sure you are paying attention to others around you to see if they are going into ‘danger’ territory.
  5. Give yourself time to ‘acclimatize’. If you haven’t trained in a while, or you haven’t trained in the heat lately, be extra careful the first 3-4 weeks. Extensive testing by the Military has found that it usually takes about 21 days for the body to ‘get used’ to the heat (by storing extra water, initiating sweating faster, etc.)
  6. Pay attention to ‘gear’. The body sheds heat through the hands, feet, and ears through special capillaries. If you are wearing gloves or particularly hot shoes, you may overheat faster. The same thing goes for weight vests. Be extra vigilant when using a vest to train in the heat!
  7. Set up near a fan or somewhere with a breeze. Fans will help evaporate the sweat off of your body creating a cooling effect. Just make sure you are well hydrated so you are sweating enough.

Heat Stroke is No Joke

Take heed. Heat stroke can cause damage to internal organs, your brain, and even lead to death. Be cool folks!

/* */